Tuesday, July 31, 2012

"Vacations In A Can" teardrop trailers...I'm in love!


I am in love with these adorable and functional trailers built by Vacations in a Can.  I am already planning a road trip with dozens of beautiful locations to set up camp.  This little trailer contains a full size mattress, storage for the essentials, two doors- one for each camper, lighting in the interior of the cabin and in the galley, a reversible fan and a small hatchback kitchen with a pull-out cooler.  I LOVE it!!!

Jason and I love traditional camping, but I don't think I would have to twist his arm too much, to give one of these babies a try.  I may get started on it tonight : )


(all photos by Thomas J. Story for Sunset's "Camping In Style" feature)


Pin It

Artist Spotlight: Ernest Zacharevic


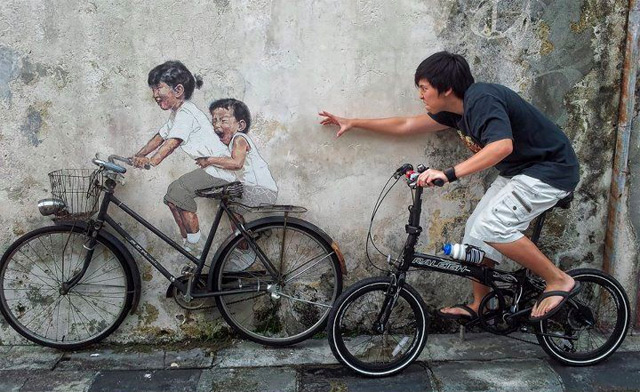
Ernest Zacharevic is a Lithuanian artist who has been transforming the streets of Penang,  Malaysia with an amazing series of interactive murals.  I LOVE them, and I love how people are interacting with them.  His depiction of children keeps the artwork very vulnerable and welcoming to passers-by...much more than if he had depicted adults.  I also love the variety of backgrounds and spaces he has chosen - they are almost as interesting visually as the artwork itself.  I can't help but smile whenever I look at his work. 


( all images via fubiz )

Here is a short video of Ernest Zacharevic painting a mural on Armenian Street in Penang:


Ernest Zacharevic at Armenian Street, Penang from ownlypenang on Vimeo.


Pin It

Monday, July 30, 2012

Summer hair series: the braided bun

source

Something I wore almost every day as a child has suddenly become extremely complicated.  Who knew that a braid could be done so many ways, or could be so intricate?  The trend right now seems to be to braid at the crown of your head and wrap it into a bun, or braiding your hair into several different braids, twisting them into individual buns at the nape of the neck.  I love this look - I never realized how many hairstyle options are out there that do not involve a hair dryer, curling iron or even hair spray. 

source

source
source


source

source

source

source

You can find the tutorial to achieve look #4 here and another tutorial that shows how to do a braided side bun can be found here.


Pin It

Garage Girls: Workout #18


source

Today's workout is based off a Crossfit workout named "Barbara", but again I am adding a little running into the mix.  If you want to do the traditional "Barbara" workout then leave off the two 400m runs.

I have spent two weekends in a row in the NC mountains...and I wish I could say that I have been hiking, climbing, camping...but no,  I was doing none of those things.  I was at the Bele Cher Music Festival in Asheville, enjoying everything Bele Cher had to offer...and it was amazing! But now, I have some work to do and this workout is where I begin....


     Warm-up: ( 3 rounds )

     5 supermans (hold to count of three)
     10 mountain climbers

     Workout: (for time)

     run 400 m

     ***5 rounds of-
     20 pull-ups
     30 push-ups
     40 sit-ups
     50 squats

     run 400 m


Have fun : )

***UPDATE***
Okay...a bit ambitious, I must admit now.  "Struggling" is not severe enough a word to express how I got through this work out today.  I am not sure what it was, but my legs felt like jello and I don't think I could have done even one more sit-up.  Probably 4 rounds would have been do-able and would not have involved as much groaning and the ever-constant inner dialogue of curse words.

Pin It

Friday, July 27, 2012

The Friday Five...

{ sharing a smoothie...more like drinking it as fast as they can.  Brain freeze anyone? }


{ home-made peach ice cream my mom made for my birthday. YUM. }


{ love old coca-cola ads...especially when they are plastered across vintage refrigerators }


{ finding candy from my childhood at the Mast General Store.  Loved these guys when I was little }


{ when I saw Mr Bubble...I couldn't resist.  He has always made me smile }


What are Your Five?


Pin It


Garage Girls: Workout #17


Another Friday.  My tendency is to make this workout memorable for the rest of the weekend, but I told my garage girls ladies that I would not make today's workout a killer.  Now... I am rethinking things just a bit   : )  Maybe not a killer... maybe my goal will be for everyone to say "I think I am going to puke" by the end of it.  That's better... right?

    
      Warm-up: (repeat exercises for 5 minutes)

      5 supermans (for a count of three)
      5 burpees
      5 jumping squats
      5 ring rows    

     Workout: this workout consists of 6 stations that we will work at for 1 min. then / rest for 15 secs.  We will be at each station 3x, so the workout will be 18 minutes long. 

      station #1 - walking lunges (1 min. work/ 15 secs. rest)
      station #2 - push-ups (1 min. work/ 15 secs. rest)
      station #3 - jumping pull-ups (1 min. work/ 15 secs. rest)
      station #4 - box jumps (1 min. work/ 15 secs. rest)
      station #5 - sit-ups (1 min. work/ 15 secs. rest)
      station #6 - air squats (1 min. work/ 15 secs. rest)

      *Make sure to write down the # of reps at each station- you will add all of your #s up at the end to see your total.  This # will be what you compare your future results to. 


Have fun : )

Pin It


Thursday, July 26, 2012

Fabulous food: Coffee Cake muffins


These muffins have been my go-to breakfast food for special occasions lately.  I baked them for our trip to the mountains- munched on a batch as we drove, still warm from the oven.  This recipe has the perfect combination of cinnamon, brown sugar and pecans along with a couple key ingredients- sour cream and nutmeg.  

This is my mom's recipe- she has always baked it as a traditional coffee cake in a 13"x9" cake pan.  I prefer to bake this recipe as muffins, because there is more of what I love.  They have the crunchy tops and soft cake center, but are not too crumbly to be eaten on the go.

Muffin Ingredients:                                             

  • 3/4 c butter, softened                                  
  • 1 c sugar                                                     
  • 2 eggs                                                         
  • 8 oz. of sour cream
  • 2 c of all purpose flour
  • 1 tsp baking soda
  • 1 tsp baking powder
  • 1/2 tsp salt
  • 1 tsp nutmeg
  • 3/4 c firmly packed brown sugar
  • 1/2 c chopped pecans
  • 1/2 tsp of cinnamon


Directions:

Combine butter and sugar - cream until light and fluffy.  Add eggs and sour cream, mixing well.  Combine the next five ingredients, add to batter, and mix well.  Spoon batter into a greased muffin pan, filling each cup only half full.

Mix the brown sugar, pecans and cinnamon and sprinkle evenly over batter.  Bake at 350 degrees for 20 to 25 minutes or until a toothpick comes out clean.  This recipe will yield 24 muffins.

* If you want to bake this recipe in a 13"x 9" pan, bake it at 350 degrees for 35 to 40 minutes.  It will serve 15.   You can also cover and chill the batter overnight if you wanted to prepare it the night before.


This is a simple recipe, but oh so good.  

Pin It

Post-it art...so cool


When we visited London a couple years ago, there seemed to be a post-it war going on high above the city streets.  We saw images spanning several windows and sometimes an entire floor.  There were cartoon characters and popular sentiments, all displayed through post-its. 

Here are two examples of more extreme post-it art.

The Kyoto University of Art and Design created these beautiful post-it art structures that were displayed in their Art Zone - "an experimental space so as to consider how to device structures and systems that would enable art to function as a part of society, and devise them together with artists, particularly young artists themselves."


"Brazilian footwear Company Melissa worked with Post It Note manufacturer 3M to create this amazing opening exhibit at their São Paulo flagship store, using 350,000 coloured Post-it Notes. Over 30,000 of them had spontaneous messages of love written on them from local residents."


(source for all Kyoto School of Art and Design images found here and source for Meliissa store images found here)

Pin It

Wednesday, July 25, 2012

popcorn cupcake tutorial


Finally...here is the popcorn cupcake tutorial I promised you.  There are many different versions of the popcorn cupcake out there- some people just use the yellow marshmallows, and some people use the white marshmallows spritzed with yellow food coloring.  Some leave the marshmallow shape and some twist them to look like popcorn.  I made mine a little differently. 


You will need three different colors of marshmallows- white, pastel yellow and a bright yellow.  The two different colors of yellow came from two different bags of the same brand of fruit flavored marshmallows found at Wal-Mart.  If you compare a few bags, you will often see a variance in color.  I bought two bags that had the widest range in color.  I think the variety of colors makes the popcorn more realistic.  You will also need a pair of kitchen scissors and some powdered sugar. 


You first need to make a small cut in the middle of the marshmallow and then make three small cuts in the top. 


 Twist the marshmallow lightly at the middle. 


Then press the three "petal" shapes made from the three cuts lightly until they begin to fan out. 

This is not a precise science.  The more shapes you have, the better the "popcorn" will look.  If the marshmallows get sticky while you are manipulating them, dust them lightly with the powdered sugar.  Be aware that the sugar will dull the yellow color of the marshmallows, so use it sparingly.

Once you have a small pile of "popcorn", start placing them on the cupcakes.  I used a vanilla cream cheese frosting on the cupcakes.  I did not dye mine, but you could dye the frosting a light yellow if you desire.


The finishing touch to the popcorn cupcakes is the cupcake liner which makes the cupcakes truly look like miniature buckets of popcorn.  Here is the popcorn cupcake liner template I used.  You can download the image and save it to your computer.  The image is 8.5"x11".  I printed it on card stock and altered the color a bit so they would look more vintage.  After cutting the liners out, I used double stick tape to form the cup and then placed them around the cupcakes.

source

Isabella loved her popcorn cupcakes, and I loved the fact that they were so simple to make, but made quite a statement at the same time.  These cupcakes would be great to make for an Oscar party too!


***Update***
 Be sure to check out the cutest "vintage circus" invitations here , and you can see Isabella's vintage circus birthday party here.

>